Wednesday, December 23, 2020

A surprise visit

I've been working from home the past few weeks because I tested positive for Covid-19, so I've been in quarantine. I received a call from a friend I have not seen in a while, and she said she found a dollhouse for me at a thrift shop while she was out shopping. She was nearby so she stopped by and dropped off the house. We spoke safely through the window for a few minutes and then she was on her way. It was so good to see her! It was perfect timing too, I was feeling kind of blue about postponing Christmas and being in quarantine. There's no better feeling though than getting a new dollhouse! 

So next in line to be built....the Tennyson! The version I received is the Tennyson by Whitney. Several dollhouse manufacturers have produced a Tennyson model over the years, with some slight variations. The main difference being a roof off the second story that covers the balcony, which is found in later Greenleaf Tennyson models. This version doesn't have the roof, and I'm fine with that. The basic design and footprint of the house is similar to my Princess Anne (which is still in the box), so I've been looking at it several ways to see how I can bash it into something different. Maybe add a wing, not sure so stay tuned on that!


Meanwhile, I've been contemplating which project to actually start next. I have so many ideas for each house, my mind keeps bouncing from project to project. I've been drawing and making notes in my dollhouse notebook quite a bit lately, and scanning eBay and some of my favorite dollhouse supply sites for accessories and building supplies. I'm excited about each one! I will probably wait to start until after the holidays are over, and I'm back to my normal routine. By then I will have settled on which project to start next.

Thank you for visiting and Happy Holidays!!

~ Mini-Shack


Friday, December 11, 2020

The Ashley Dollhouse Video

Pleased to present the short little video for the Ashley Dollhouse. The video includes the construction process as well.

This was built for a sweet little 6 year old girl named Jenise. I asked her if she wanted me to make her a dollhouse and she said YES! Then I asked her what color she would like it and she said PINK PINK PINK. I built this in about 2 months, just working on it a few nights a week and weekends. Enjoy!


Thank you for visiting!


~ Mini-Shack

Monday, December 7, 2020

A cute little project, The Dura Craft Ashley


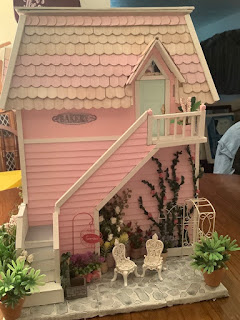
I just finished building a Dura Craft Ashley dollhouse for a sweet little 6 year old girl for Christmas. This is the first house I've ever built that was meant for a child to actually play with, so I did a few things different. I reinforced the floors and walls as I went along, I sealed the front door shut and I did not use the spiral staircase that comes with the kit. I think it would have been too fragile and may have broken easily. Instead of the spiral staircase I made my own out of mini Jenga blocks. I intentionally angled the staircase the way I did, so that she would have more living room space to play with.

I usually furnish and detail my houses as well, but she'll be receiving this empty so all I did was add some cute little curtains, and added flower boxes to the front dormer windows. I really had to stop myself, I wanted to keep adding more and more details, out of habit. She'll have plastic "play" furniture for the dollhouse, as she's still a little too young. The house has already been picked up and no longer in my workshop, so I can only hope now that she has a magical Christmas and gets many years of enjoyment out of the little Ashley.

I will make a video of the documented build step by step, including making the Jenga staircase. It's not a very large house, and it's not a complicated one either. I would consider it a quick build, except you have to cut all your own trim with this kit so that's pretty time consuming...and there's a lot of trim required to make it look decent. They do provide the trim for you, which is great. I used that, plus some extra trim that I picked up at Lowes. 

Also, as I do with all my houses, there is a large decorative embellishment on the front of the house and also on the side of the house. I put her name on the front of the house as well, just to make her feel extra special.

Here's a few photos:


Dura Craft Ashley Dollhouse

Dura Craft Ashley Dollhouse

Dura Craft Ashley Dollhouse

Dura Craft Ashley Dollhouse

Dura Craft Ashley Dollhouse

Dura Craft Ashley Dollhouse

Dura Craft Ashley Dollhouse


Keep an eye out for the detailed video. Thank you for viewing and Happy Holidays!!

~ Mini-Shack

Monday, October 12, 2020

Video ready for the Brimbles Mercantile by Greenleaf

I finally got the video uploaded for BB Sweets, my Brimble's Mercantile candy shop and bakery. I took a lot of photos, with three different cameras, in both natural light and artificial. The result of that was several hundred detailed photos to edit and select for final video insertion. I was a little overwhelmed, so I picked the best that I could and threw together this video.

I also documented the entire build from start to finish. I like to do a separate video for the builds, since there are so many photos involved. I personally don't care for videos over 5 minutes, so I try not to create them either. I like to make a "build" video in case anyone gets stuck doing the same kit, they can pause the video and hopefully it will help them out.

So for now, please enjoy the interior and exterior video of the finished product and imagine yourself in a sweet and yummy place to feel like a kid again!!


Thanks for visiting!

 ~ Mini-Shack

Tuesday, October 6, 2020

My Brimble's Mercantile by Greenleaf aka "BB Sweets"

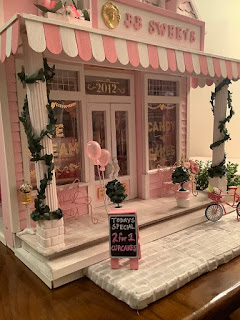
My sweet shop is finally done. Lovingly named BB Sweets with my grandson in mind, who calls me BB.  I didn't keep track of build time because I paused a few times while working on this. This was made from a kit by Greenleaf called the Brimble's Mercantile. I've been thinking of a bakery for several years, so to get to the end and have this completed is a real joy. I spent many nights in front of the TV rolling tiny candy, making tiny cupcakes and cakes, making boxes with labels and filling tiny jars full of colorful treats. As you can see it's very detailed on the inside, but the exterior was time consuming as well. 


Brimble's Mercantile by Greenleaf

Brimble's Mercantile by Greenleaf

Brimble's Mercantile by Greenleaf


Brimble's Mercantile by Greenleaf

Brimble's Mercantile by Greenleaf

Brimble's Mercantile by Greenleaf


I always imagined my bakery with a striped awning on the front. I was able to use the wood roof structure that comes with the kit because of it's shape, all I had to do was add the hanging tabs. They're actually snipped off tongue depressors, and the measurements worked out in my favor because the stripes lined up almost perfectly.

The siding was measured, cut, and glued on one strip at a time. The shingles were cut and painted, then applied one by one (no fun around the dormers!). The structure sits on plywood that is extended on both ends. I used this space to create extra patio area, with faux brick on the front and stone in the back. I used Paperclay for both ends. 

The major endeavor was the exterior staircase. The original kit intends for the stairs to be on the inside. I didn't care for this idea because it took up a lot of space, both downstairs and upstairs. I sealed the two windows off downstairs as well, I needed the wall space. I moved the staircase to the back of the building, and was able to keep it the same shape with the upper landing close to the upstairs window. I made the window into a door and then built a landing with railings. Made a few adjustments on the bottom level and it lined up pretty well.

Once I can grab the perfect sunlight hitting the bakery I'll post proper interior detailed photos, and create the video. I'm finding that flash photography doesn't do this justice. 

Getting excited about my next project, The Mint Julep!


Thanks for visiting!

~ Mini-Shack

Saturday, October 3, 2020

The Mint Julep by Walmer/Lilliput

After receiving this kit in the mail, I have thought about it pretty much every day, non-stop. I guess it's screaming for me to start this one next! I was exploring options to make it as beautiful as possible and came across a listing on eBay for a wing addition. The listing was from the same seller I bought the house from, who is also in the same Facebook group as me. I wasn't sure if it would fit my house so I started researching which model wing additions are compatible, and figured out there are 2 styles - a gable roof and a flat roof. I sent the seller a message on Facebook and she was kind enough to look though her inventory of kits. She was able to locate not one - but two - gable style wing additions. I would have preferred the flat roof addition, but there is probably a zero chance of finding two for sale. These houses are older and the companies are out of business. We made the arrangements and she shipped them right out to me. I am very excited to get started - but I need to quickly build a small house for a Christmas present for a relative. Which will probably be the Ashley or the Buttercup.

Here is a stock photo of the Mint Julep and the wing addition (can be left or right):


I'm not sure of the measurements yet, but I'm preparing for this to be a fairly large house. I really want to make it beautiful, with it's own base with landscaping. I'm going to need to take a trip to Lowes and get some plywood!

Progress picture to come.....I am currently waiting on a shipment in the mail of some corner trim that I desperately need to finish my Brimble's Mercantile. I ran out, and the roof shingles look horrible in the corners so I absolutely must cover those up. It'll enhance the overall look too, so it's a win-win. It is the only thing holding up my photo session. I don't dare post any pics with those ugly corners LOL. There will be a full post soon however on the Brimble's - aka "BB Sweets".


Thanks for visiting!

~ Mini-Shack

Sunday, September 27, 2020

Projects

As I'm finishing up the Brimble's Mercantile (photos and videos coming soon) I'm looking around trying to find the perfect display spot and realizing one thing - I have too many future projects! I need to plan properly so I can display them all once they're complete.

Over a short amount of time I have acquired some of my favorite kits on my wish list - now my stack of boxes are piling up. I have plans for them all, my imagination works overtime and as I'm going through my stash of items I'm dividing things up for certain houses. I honestly don't know which house to start next, I'm excited about a few but some I have had a while. Here's what I have, in the order I have purchased them:

Pioneer Log Cabin by DuraCraft - This one I am slightly afraid to open. I understand it is all logs, and I'm used to working with wood. It makes sense, since it's a log cabin, but from what I have read I'll need a good saw and some patience. I've already collected a few things for this cabin, and my plans are to do whitewashed wood with a metal roof instead of the traditional log cabin look.

The Buttercup by Greenleaf - This is a small house that I originally bought when I was looking for something to do a bakery in. I always wanted a Brimble's Mercantile and was getting impatient trying to find one, so when I saw this come up on Marketplace I bought it. Shortly afterwards, I found the Brimble's and set the Buttercup aside.

The Ashley by DuraCraft - This is another small house, which is very similar to the Buttercup but with a "bonus". I had looked at this house several times because it has a spiral staircase, plus it comes with tudor style trim. I believe I paid around $20 so when I received it I stole the trim and the staircase. The wood alone was worth the money I paid. I will still build the house, I may even cut the 2nd floor in half and do a set of floating stairs.

The Princess Anne by Real Good Toys - This beautiful Victorian house was for sale on Marketplace for several weeks. I couldn't stand it anymore and I bought it. I already have an Alison Jr by RGT which is about the same size, so I'm excited to build this one and decorate it to match the Alison.

Victorian Cottage Jr by Real Good Toys - This house was included in the sale with the Princess Anne. It's an adorable smaller dollhouse, I would love to make it super shabby chic. I believe I could build this one pretty quick.

The Highland by Artply - I was so thrilled to find this kit new in an unopened box on eBay. I ended up paying more for shipping than I did for the house but I'm not even bothered about that. They don't come up very often, and this one was mis-indexed, so I feel like it was meant for me to find it. I first saw this house many years ago when I was looking at The Brookwood by Greenleaf. They're both unique A-frame style homes. Since the Brookwood was more common and easier to find, I ended up building that instead and forgot about the Highland. Over the years I have imagined a Spanish style house, so I've decided that's what I'm going to do with my Highland. Other than that it would make a perfect 70's home.

The Mint Julep by Walmer/Lilliput - I have always wanted a regal colonial style plantation home, but the ones I've admired the most are very large. I definitely could not make room for one. So this Mint Julep house is perfect in both size and appearance. I saw it listed on eBay and it was an unopened box, which I have a personal policy of always buying unopened boxes, and I kept thinking about it every day so I took the plunge and bought it. I wouldn't call them rare, but you don't see them very often.

In addition to the kits above, I still have two Greenleaf Harrison dollhouses that need to be either finished off individually, or bashed together. I'd love to bash them together, and I've drawn up some plans, just not sure about my confidence level in making a giant mansion. Or if I have a place to display something that large.

My Alison Jr is empty right now and needs a make-over. The flower boxes are empty and a few of the window panes need to be replaced. I'm planning on repainting it with soft shades of mostly white with mint green, lilac and blush accents. The interior needs a make-over too. New wallpaper, paint, doors and staircase railings.

I also have three room boxes and a 1:144 scale tudor house and log cabin. The tudor house came as a bonus with one of my Harrison's, and I don't work in that scale, so I'm not sure what I'm going to do with that one. The room boxes are already set up with furniture etc, they just need to be decorated (walls, floors etc)

I have enough fun stuff to keep me busy for several years. I've always had a goal in the back of my head to have a dollhouse in all different styles of homes. When I have completed all of the above I'll have a pretty good combination of styles. Victorian, Colonial, A-Frame, Spanish Style, Tudor Style, Traditional, Gingerbread and a Merchant.  I'll definitely have a neighborhood :-)


Thanks for visiting!

~Mini-Shack


Saturday, January 18, 2020

A closer look at The Brookwood and it's ties to SW Florida

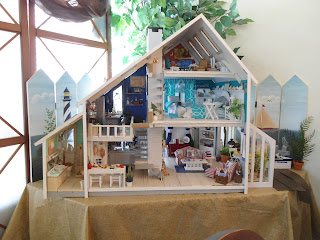
This was a great house to build. I looked forward to it for years, and planned it in my head over and over again. I'm a South Florida native, born and raised on the beach and on the water. Many of the features in this house are specific to Southwest Florida, and all of the shells in my collection are local.

The Brookwood by Greenleaf built by Mini-Shack
The Brookwood by Mini-Shack
When I decided to build this house I didn't have a clear view of the final results, just the determination that it would be a beach house. That's a bigger category than I realized however. There's the Cape Cod beach theme, the Bahamian bright colors theme, the tropical palm tree and neutral natural colors theme, the cartoon-ish bright colored beach balls/beach umbrellas/beach chairs theme, the blue and red nautical theme....see what I mean? As with all my creations - I go with what I have on hand, what I can make myself and what actually "speaks" to me. I'm so pleased with the end results of my Brookwood, it turned out to be a combination of a beach house / boat house. The two folding panels behind the house that show a lighthouse and a coastal scene belonged to my close friend Susan who passed away in 2010. She loved lighthouses and collected all sorts of them. I have several of her lighthouses and treasure them, and anytime I see one I think of her...including building this house.

The Brookwood by Greenleaf built by Mini-Shack
The Brookwood by Mini-Shack
I stayed true to the kit on the exterior of the house. I added the large anchor in the center of the main front window. I like to have something large on my houses that makes it easily identifiable. I have one on my Arthur house too. I also added the navy blue railings on the balcony. The balusters are actually the discarded pop outs from the porch railings on my Arthur house. A nod to Greenleaf, as the shapes of their balusters, windows, etc are easy to spot on a Greenleaf product. I made the front deck that comes with the kit a deck that resembles a boat dock. Once I did that, well of course I needed a boat! Picked up a little boat at the craft store and added a few little necessities you would need if you wanted to jump in and go fishing.  Including a lamp, cast nest, fishing nets, a life jacket and fishing rods.

The Brookwood by Greenleaf built by Mini-Shack

On the balcony I placed a birdhouse that I found in an antique store in Arcadia, FL. It's a small lighthouse made by Lenox in 1995 as part of a series. The small light blue ceramic ships wheel that is sitting on the table next to the chair was found in the same store, as was the ceramic sailboat sitting in the window in the bathroom.

The Brookwood by Greenleaf built by Mini-Shack

The Brookwood by Greenleaf built by Mini-Shack

The Brookwood by Greenleaf built by Mini-Shack

The front deck has a bench with a cute little sea bird, and a lounge area. I made the railing posts with 2 different sized dowels, cut and stained, wrapped in twine glued on, bent paperclips drilled into the tops for the rope. I also made the windsock hanging by the front door. Easy with ribbon, string, hardware and glue. The palm boxes are the flower boxes that come with the kit, I added extra trim and color coordinated it with the house. The bottom of the entire house is trimmed in basic brick. The front wall with the kitchen window is all brick, but painted white to match the white stucco of the rest of the house.

The Brookwood by Greenleaf built by Mini-Shack

The Brookwood by Greenleaf built by Mini-Shack

The Brookwood by Greenleaf built by Mini-Shack

The Brookwood by Greenleaf built by Mini-Shack

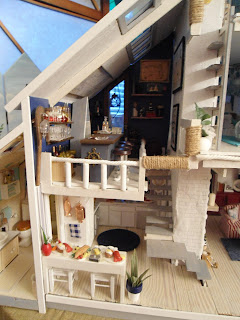
Inside the home I made a few minor changes to the kit. The fireplace stack originally had the 2nd floor fireplace a rounded opening, so I made that square. The 1st floor staircase ended up being floating stairs, because the space is limited in that area. I also didn't use the trademark Brookwood brace that runs across the front of the home, it really just didn't look right and the structure is sound with just the bare minimum that I left of the brace. I trimmed as much as I could with rope to give a more nautical feel. The bar area felt smaller with the half wall so I discarded that and used an open nautical railing instead. I also did that with the railings on the 2nd and 3rd levels. I added ceilings beams to the living room as decoration, they don't serve any structural purpose. Other than that the kit is built as designed.
The Brookwood by Greenleaf built by Mini-Shack

The Brookwood by Greenleaf built by Mini-Shack


The Brookwood by Greenleaf built by Mini-Shack


The Brookwood by Greenleaf built by Mini-Shack


Some of the features on the first level that I love the most are in the small details. My favorite living room item is the display plate with the ship on it. I got it off eBay so I have no idea of its origins. The book ends I made with balsa wood and charms from the craft store.


I hand made this shell in a glass case which is on display in the corner cabinet. It's a shell from my collection glued to a small dowel, glued to the base with a small bit of moss. The cabinet itself was also made by me - purchased as unfinished so I painted it, added the background to the shelves and painted an anchor charm red and glued it to the bottom. 


I made the ceiling fan with popsicle sticks, beads, twine, button, wood dowel. I added the ceiling beams extra for an added touch. I hand placed the shells on the fireplace. They're placed in paperclay, then covered in sealer, then painted. The rest of the fireplace stack is stucco. The mantle and bottom was made with sample tiles, sealed and glossed.


I painted the oars that came with a little wooden boat I bought that is in the bar, then aged them slightly and used them as wall decoration. The mini magazines were made by me - Boaters World, Coastal Living Florida magazine and a few newspapers, and the magazine holder is a Shackman with an anchor charm glued to the outside. The hanging lamp is gorgeous when the light shines through it, its a beautiful shade of blue.


On the patio I placed a terrarium that I made so easy: its real dirt, real sand and artificial succulent. I staged a coffee scene with a cute set of yellow china that I bought on eBay. The pelican is actually a trinket box.


In the kitchen I wanted to stage a lobster dinner, since I already had the food plates and a few loose lobsters that I could put in a copper pot on the stove. I collected as much copper as I could because I wanted to keep the kitchen colors simple, and copper goes well with blue and white. In all honesty I did not put in as much effort in the kitchen as I could have. I hand built the appliances and counters because it's an awkward sized room, standard 1:12 furniture does not fit. The chalkboard sign says "Dinner at 7:00 <3"


The bar was a lot of fun, and it has several local items in it. The main focal point are the chart maps on the stairwell wall. The bottom one is the Boca Grande Lighthouse and the top is a SW Florida chart map featuring many sport fishing species. The aged map on the wall above the shelves is of the Gulf of Mexico, and the larger chart map above the bar is an antique map of the Atlantic Ocean that actually came from a book of scrapbook paper that I bought. There's plenty of alcohol in the bar as well. I hand made the shelves with the glasses on it, it's just a mirror from an old make-up compact with stained wood shelves glued on.


The bedroom was one of the first rooms I finished. I hand made the bed by using the pop out wood from the front window arch as the headboard. I sewed all the linens and pillows and made the rug on the floor as well. The furniture was all hand decorated and the shells are all local. The service tray was originally wood, I painted it white and sealed a beach scene on the base. The hanging light over the reading chair is hand made out of a champagne cork holder, empty scotch tape plastic roll with hanging beads glued around it. The ladder is built in as part of the kit. I used the pop outs of the ladder as the steps.


The art studio in the loft contains mostly paintings done by my adult son. I originally asked him to paint a few for me to decorate the house with, but then got the idea to do this studio instead. I tried to make it as messy as possible, as you can tell. I also wanted a portion of the space to be relaxing, so you could also take a break up there. I have the chair with the binoculars sitting next to it, imagining that the beach view from the skylights is spectacular. There's also a large round window on the back wall that would have water views, so I feel like this is a perfect place to create art.


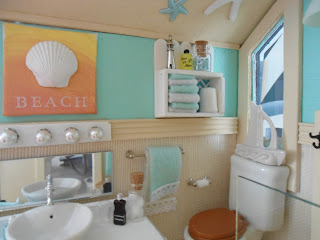
The bathroom is an attachment to the house, you build it separate then secure it at the end. The color is truly not what I wanted, I blended it myself and I liked it at the time. But when I got to the end I wished I would have done better. I hand made the shower. It was easy: sample tiles, balsa wood, the shower fixture I bought and a piece of glass out of a small photo frame from Dollar Tree. The bamboo floor mat is coffee stir sticks. The painting was also done by my son, I added the shell (a real shell painted white) and embossed the word "beach". The row above the bathroom door includes an actual tiny sand dollar, real sharks tooth and real beach shell.


For detailed photos of the house see my blog posts below this one, I have a video of the exterior/interior and also a video of the construction process step by step, from start to finish!

Here is my YouTube Channel as well: Mini-Shack 


Thanks for looking!

~ Mini-Shack