Showing posts with label Retro. Show all posts

Tuesday, March 28, 2023

The Lundby Update

One of my favorite things to do is go treasure hunting, aka thrift shopping. My main goal is to find a dollhouse or dollhouse accessories, but it hardly ever happens. I finally found a pretty good score at my local Goodwill store, a Lundby Gothenburg model. I saw it the moment I walked in the store, and made a beeline to the toy section in the back corner. Once I had it in my cart I browsed real quick then went to the register. I mentioned that I was a dollhouse builder to the clerk, and she was relieved. She said she was afraid a child was going to buy this and destroy it, and she could tell it was a collectors item. 


The house included quite a few accessories, and it's in really good shape. The electric wiring still works, and there were several light fixtures included as well. I couldn't resist for $9.99 and I was so excited to get home and check it all out. Over time I have accumulated a few Lundby pieces in furniture lots I've bought, plus I bought several pieces from the Michaels Store dollhouse collection which are the same scale, so I knew I could end up furnishing the entire thing. 

I decided it was time to finally give this house some attention, and do what I call - a quick redo. By that I mean I didn't do as much as I could potentially do. I wanted to re-cover all the floors and walls, yet try to keep as many of the original pieces that came with the house. Here's a few before and after photos:


BEFORE:

AFTER:


It wasn't a hard decision to make this a Mid Century Modern themed house. It's practically made for that. Since I have an Artply Highland MCM dollhouse in the wings waiting to be built, I had already been collecting things for MCM decor. I have several wallpaper packs in that theme, so I chose the ones I thought would best fit my vision for this house. I ended up keeping the wall color in the living room areas, they already blended well with my theme.

Kitchen photo: I replaced the wallpaper and flooring, and added the counter bar, barstools and tea cart. I was lucky to get the original Lundby kitchen set with the house.  The light fixture is original as well.


Dining Area: I replaced the wallpaper and flooring, and kept the original corner hutch that came with the house. The light fixture is original as well. Lucky to get the staircase in good condition.


Bathroom: Lucky to get the entire original Lundby bathroom set with the original seashell wallpaper. There's a section of ripped wallpaper that I hid with the cabinet and plant. I replaced the flooring, and that's all I did in this room.


Bedroom: I replaced the flooring with white carpet and the wallpaper with a lime green MCM pattern. The fireplace in the corner came with the house, and the light fixture is original too.


Sitting Room: I covered the floor with carpet in this area, but left the walls original. I made it a groovy music area. There's a record player with extra records on the table in the middle. The Lundby fish tank came with the house, but the Lundby bookshelf was already in my stash of furniture. I kept the original curtains in this room, and built the color theme around them.


Living Room: I kept the 3 wall hangings/pictures that came with the house, but that's the only thing original in this room. I covered the floors, and I made the MCM clock and accent wall. The Lundby fireplace was already in my stash.


More photos of the inside of the house:


I enjoyed this quick redo, and in the future I'm sure I'll be updating it. You know what they say..."is a dollhouse ever really done?" I'm in several Lundby groups on Facebook, and there's a few pieces I've had my eyes on. The first thing I would like to replace is the dining room set - I would love to find the orange and white tulip table and chairs set to put in this house. But for now, I have a shelf specifically for the house to sit on, high above all the others in my dollhouse display room.

Thank you for visiting!

~ Mini Shack

Friday, January 1, 2021

A pivot to mid-century modern

I was fortune enough to receive a set of dollhouse furniture as a Christmas gift, it's a mid-century modern set that my friend got at Hobby Lobby. It's simply beautiful, I was so excited because it was so unexpected! Since I have so many dollhouse kits in boxes waiting for me and I was on the fence on which to start next, I immediately thought of my Artply Highland. It's meant to be a mid-century modern dollhouse but I had planned to make it a Spanish Style mansion. I'll stick with mid century now though, I have always admired the architecture and decorating style of that period. Now I have a jump start with my new furniture. It has motivated me to get going, it's a new year - new dollhouse. 


Mid-Century Modern Dollhouse Furniture


I was born in the 60's, so I lived through this time period and remember it well. I have fond childhood memories when I see some of the inspirational photos I've been looking at. I've been doing quite a bit of researching on the architectural features, just to confirm what I already know however. I came across this great description of the period:

"Sometimes it takes a generation or two removed from an architectural style to appreciate it. Such is the case of mid-century modern. Mid-century modern is a style of design, from roughly the 1930s through the mid–1960s, characterized by clean lines, organic and streamlined forms, and lack of embellishment. It reached is height of popularity after World War II, where it was used in residential structures, with the goal of bringing modernism into America's post-war suburbs."  Link to article


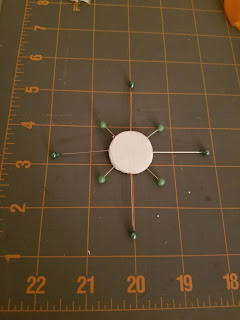
I've been looking at DH furniture from this time period on several websites and certain pieces are quite pricey. There's some great stuff available that I would love to have, I guess you could call them "designer" pieces. It's unlikely I will indulge, since a lot of items from this era can be hand made because its a simple design. The color palette is important as well, and the pop's of color can make or break a room. The decor is easy, lots of globes, geometric shapes, starbursts and wood grains. I made this wall decoration in about 10 minutes, which I may or may not put a clock in the center eventually.


Mid-Century Modern

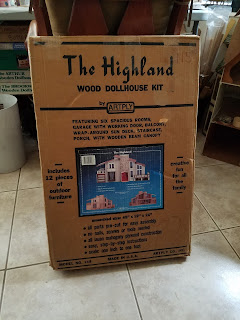
So as soon as all the Christmas decorations are put away and all my spaces are back to normal I'll be getting the Highland ready to go. I have yet to open the box, I always look forward to that moment. Then the construction shall begin. As usual, I will document the build step by step so I can do a video at the end. Even though this is a large house, I really don't anticipate taking as long as I usually do. There are minimal details involved, intentionally, and that's where I usually spend most of my time. Here is the Highland as she sits:


Artply Highland


Here is a closer photo of the house as the manufacturer imagined it...notice it has a garage, which is kind of unique for a dollhouse:


I remember when I found this house on eBay, I was so excited to finally find one and when it came in the mail I was smiling for days. I knew I probably wouldn't be able to get to it right away, so I've always had a happy little feeling inside knowing it would always be there waiting for me. As I mentioned above, I had been drawing plans to bash it a little into a Spanish Style home, and I have some goodies I've been collecting already for that style, so I'll have to get creative with a different kit to go in that direction. In the meantime - my focus is back in time to the 60's!

Happy New Year and thanks for visiting!

~ Mini-Shack


Wednesday, January 7, 2015

Tuesday, January 6, 2015

The Greenleaf Travel Trailer in 15 Days

This Travel Trailer project was so much fun! I worked on it non-stop nights and weekends for 15 straight days, and I managed to finish it by Christmas. And I learned a lot while working on it. The kit produces a finished trailer that is completely empty on the inside, so the imagination is limitless when planning and designing it. Since my daughter requested a 50's retro style design, it was easy for me to choose a color theme and the accessories. The challenge was the furniture, since afterall it's a travel trailer so typical mini furniture doesn't work. The balance to that was it wasn't a lot of space to fill. I've posted a few photos below, and I'm working on making a short video. Enjoy!

Greenleaf Travel Trailer
Exterior

Greenleaf Travel Trailer
Exterior - Front End

Greenleaf Travel Trailer
Exterior - Rear End. The License Plate says "MINI"


Here are a few photos of the Interior. I added walls to separate the bedroom and bathroom, added upper and lower cabinets in the kitchen area, and built in a couch in the lounge area.

Greenleaf Travel Trailer
Interior - Before the Additions


Greenleaf Travel Trailer
Interior - Finished

Greenleaf Travel Trailer
Interior - Lounge and Kitchen Area

Greenleaf Travel Trailer
Interior - Kitchen Area

Greenleaf Travel Trailer
Interior - Bedroom and Bathroom Area

Greenleaf Travel Trailer
Interior - Bedroom and Bathroom Area

Greenleaf Travel Trailer
Interior - Top View

Greenleaf Travel Trailer
Interior - Top View

The video I'm making has close up photos of the interior and exterior. There's so many cute little details inside. As with any mini project though, photos can never due it justice. You appreciate them much more seeing it in person.

Now that this project is done, I'll finally be starting The Arthur by Greenleaf. I got a new Dremel tool for Christmas, along with a box of attachments, so the kit bashing I have planned will go much smoother now. I will also be practicing while building The Arthur, because once I'm done with that I'm planning to do The Brookwood by Greenleaf. Mine will be a beach house, of course. I've already started collecting items for it :-)


Thank you for looking!