Friday, January 1, 2021

A pivot to mid-century modern

I was fortune enough to receive a set of dollhouse furniture as a Christmas gift, it's a mid-century modern set that my friend got at Hobby Lobby. It's simply beautiful, I was so excited because it was so unexpected! Since I have so many dollhouse kits in boxes waiting for me and I was on the fence on which to start next, I immediately thought of my Artply Highland. It's meant to be a mid-century modern dollhouse but I had planned to make it a Spanish Style mansion. I'll stick with mid century now though, I have always admired the architecture and decorating style of that period. Now I have a jump start with my new furniture. It has motivated me to get going, it's a new year - new dollhouse. 


Mid-Century Modern Dollhouse Furniture


I was born in the 60's, so I lived through this time period and remember it well. I have fond childhood memories when I see some of the inspirational photos I've been looking at. I've been doing quite a bit of researching on the architectural features, just to confirm what I already know however. I came across this great description of the period:

"Sometimes it takes a generation or two removed from an architectural style to appreciate it. Such is the case of mid-century modern. Mid-century modern is a style of design, from roughly the 1930s through the mid–1960s, characterized by clean lines, organic and streamlined forms, and lack of embellishment. It reached is height of popularity after World War II, where it was used in residential structures, with the goal of bringing modernism into America's post-war suburbs."  Link to article


I've been looking at DH furniture from this time period on several websites and certain pieces are quite pricey. There's some great stuff available that I would love to have, I guess you could call them "designer" pieces. It's unlikely I will indulge, since a lot of items from this era can be hand made because its a simple design. The color palette is important as well, and the pop's of color can make or break a room. The decor is easy, lots of globes, geometric shapes, starbursts and wood grains. I made this wall decoration in about 10 minutes, which I may or may not put a clock in the center eventually.


Mid-Century Modern

So as soon as all the Christmas decorations are put away and all my spaces are back to normal I'll be getting the Highland ready to go. I have yet to open the box, I always look forward to that moment. Then the construction shall begin. As usual, I will document the build step by step so I can do a video at the end. Even though this is a large house, I really don't anticipate taking as long as I usually do. There are minimal details involved, intentionally, and that's where I usually spend most of my time. Here is the Highland as she sits:


Artply Highland


Here is a closer photo of the house as the manufacturer imagined it...notice it has a garage, which is kind of unique for a dollhouse:


I remember when I found this house on eBay, I was so excited to finally find one and when it came in the mail I was smiling for days. I knew I probably wouldn't be able to get to it right away, so I've always had a happy little feeling inside knowing it would always be there waiting for me. As I mentioned above, I had been drawing plans to bash it a little into a Spanish Style home, and I have some goodies I've been collecting already for that style, so I'll have to get creative with a different kit to go in that direction. In the meantime - my focus is back in time to the 60's!

Happy New Year and thanks for visiting!

~ Mini-Shack


Wednesday, December 23, 2020

A surprise visit

I've been working from home the past few weeks because I tested positive for Covid-19, so I've been in quarantine. I received a call from a friend I have not seen in a while, and she said she found a dollhouse for me at a thrift shop while she was out shopping. She was nearby so she stopped by and dropped off the house. We spoke safely through the window for a few minutes and then she was on her way. It was so good to see her! It was perfect timing too, I was feeling kind of blue about postponing Christmas and being in quarantine. There's no better feeling though than getting a new dollhouse! 

So next in line to be built....the Tennyson! The version I received is the Tennyson by Whitney. Several dollhouse manufacturers have produced a Tennyson model over the years, with some slight variations. The main difference being a roof off the second story that covers the balcony, which is found in later Greenleaf Tennyson models. This version doesn't have the roof, and I'm fine with that. The basic design and footprint of the house is similar to my Princess Anne (which is still in the box), so I've been looking at it several ways to see how I can bash it into something different. Maybe add a wing, not sure so stay tuned on that!


Meanwhile, I've been contemplating which project to actually start next. I have so many ideas for each house, my mind keeps bouncing from project to project. I've been drawing and making notes in my dollhouse notebook quite a bit lately, and scanning eBay and some of my favorite dollhouse supply sites for accessories and building supplies. I'm excited about each one! I will probably wait to start until after the holidays are over, and I'm back to my normal routine. By then I will have settled on which project to start next.

Thank you for visiting and Happy Holidays!!

~ Mini-Shack


Friday, December 11, 2020

The Ashley Dollhouse Video

Pleased to present the short little video for the Ashley Dollhouse. The video includes the construction process as well.

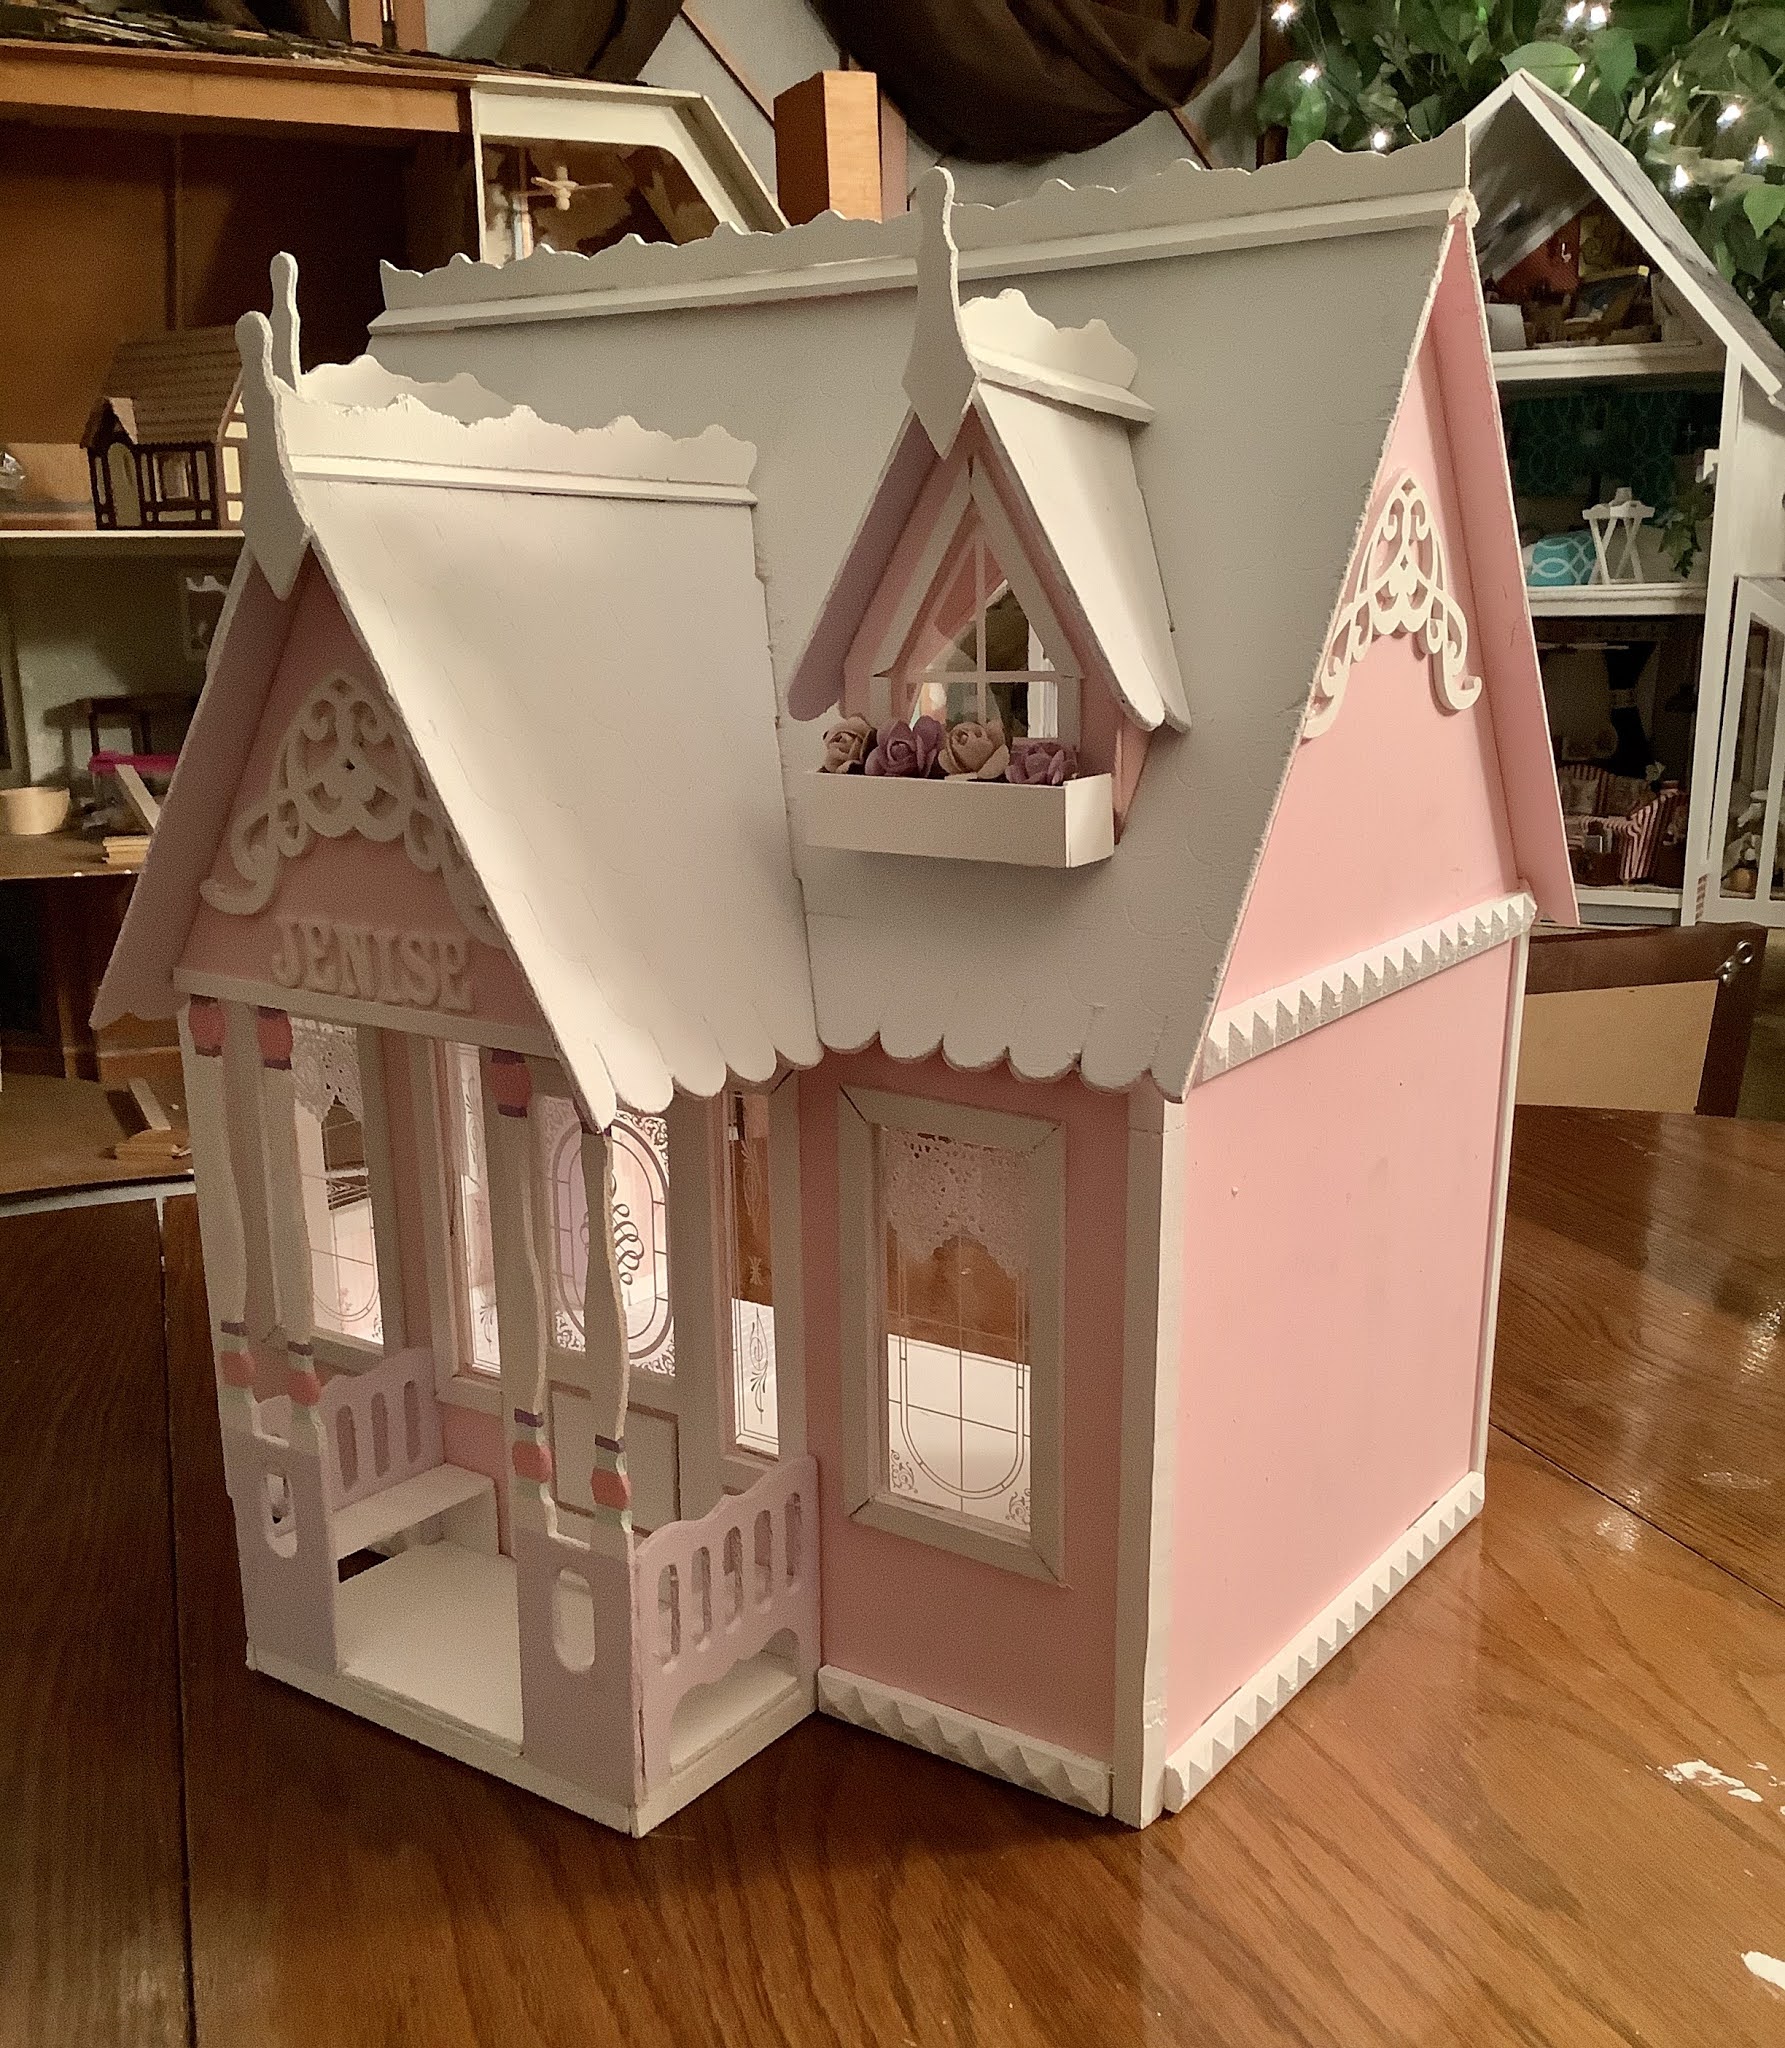
This was built for a sweet little 6 year old girl named Jenise. I asked her if she wanted me to make her a dollhouse and she said YES! Then I asked her what color she would like it and she said PINK PINK PINK. I built this in about 2 months, just working on it a few nights a week and weekends. Enjoy!


Thank you for visiting!


~ Mini-Shack

Monday, December 7, 2020

A cute little project, The Dura Craft Ashley


I just finished building a Dura Craft Ashley dollhouse for a sweet little 6 year old girl for Christmas. This is the first house I've ever built that was meant for a child to actually play with, so I did a few things different. I reinforced the floors and walls as I went along, I sealed the front door shut and I did not use the spiral staircase that comes with the kit. I think it would have been too fragile and may have broken easily. Instead of the spiral staircase I made my own out of mini Jenga blocks. I intentionally angled the staircase the way I did, so that she would have more living room space to play with.

I usually furnish and detail my houses as well, but she'll be receiving this empty so all I did was add some cute little curtains, and added flower boxes to the front dormer windows. I really had to stop myself, I wanted to keep adding more and more details, out of habit. She'll have plastic "play" furniture for the dollhouse, as she's still a little too young. The house has already been picked up and no longer in my workshop, so I can only hope now that she has a magical Christmas and gets many years of enjoyment out of the little Ashley.

I will make a video of the documented build step by step, including making the Jenga staircase. It's not a very large house, and it's not a complicated one either. I would consider it a quick build, except you have to cut all your own trim with this kit so that's pretty time consuming...and there's a lot of trim required to make it look decent. They do provide the trim for you, which is great. I used that, plus some extra trim that I picked up at Lowes. 

Also, as I do with all my houses, there is a large decorative embellishment on the front of the house and also on the side of the house. I put her name on the front of the house as well, just to make her feel extra special.

Here's a few photos:


Dura Craft Ashley Dollhouse

Dura Craft Ashley Dollhouse

Dura Craft Ashley Dollhouse

Dura Craft Ashley Dollhouse

Dura Craft Ashley Dollhouse

Dura Craft Ashley Dollhouse

Dura Craft Ashley Dollhouse


Keep an eye out for the detailed video. Thank you for viewing and Happy Holidays!!

~ Mini-Shack

Monday, October 12, 2020

Video ready for the Brimbles Mercantile by Greenleaf

I finally got the video uploaded for BB Sweets, my Brimble's Mercantile candy shop and bakery. I took a lot of photos, with three different cameras, in both natural light and artificial. The result of that was several hundred detailed photos to edit and select for final video insertion. I was a little overwhelmed, so I picked the best that I could and threw together this video.

I also documented the entire build from start to finish. I like to do a separate video for the builds, since there are so many photos involved. I personally don't care for videos over 5 minutes, so I try not to create them either. I like to make a "build" video in case anyone gets stuck doing the same kit, they can pause the video and hopefully it will help them out.

So for now, please enjoy the interior and exterior video of the finished product and imagine yourself in a sweet and yummy place to feel like a kid again!!


Thanks for visiting!

 ~ Mini-Shack

Tuesday, October 6, 2020

My Brimble's Mercantile by Greenleaf aka "BB Sweets"

My sweet shop is finally done. Lovingly named BB Sweets with my grandson in mind, who calls me BB.  I didn't keep track of build time because I paused a few times while working on this. This was made from a kit by Greenleaf called the Brimble's Mercantile. I've been thinking of a bakery for several years, so to get to the end and have this completed is a real joy. I spent many nights in front of the TV rolling tiny candy, making tiny cupcakes and cakes, making boxes with labels and filling tiny jars full of colorful treats. As you can see it's very detailed on the inside, but the exterior was time consuming as well. 


Brimble's Mercantile by Greenleaf

Brimble's Mercantile by Greenleaf

Brimble's Mercantile by Greenleaf


Brimble's Mercantile by Greenleaf

Brimble's Mercantile by Greenleaf

Brimble's Mercantile by Greenleaf


I always imagined my bakery with a striped awning on the front. I was able to use the wood roof structure that comes with the kit because of it's shape, all I had to do was add the hanging tabs. They're actually snipped off tongue depressors, and the measurements worked out in my favor because the stripes lined up almost perfectly.

The siding was measured, cut, and glued on one strip at a time. The shingles were cut and painted, then applied one by one (no fun around the dormers!). The structure sits on plywood that is extended on both ends. I used this space to create extra patio area, with faux brick on the front and stone in the back. I used Paperclay for both ends. 

The major endeavor was the exterior staircase. The original kit intends for the stairs to be on the inside. I didn't care for this idea because it took up a lot of space, both downstairs and upstairs. I sealed the two windows off downstairs as well, I needed the wall space. I moved the staircase to the back of the building, and was able to keep it the same shape with the upper landing close to the upstairs window. I made the window into a door and then built a landing with railings. Made a few adjustments on the bottom level and it lined up pretty well.

Once I can grab the perfect sunlight hitting the bakery I'll post proper interior detailed photos, and create the video. I'm finding that flash photography doesn't do this justice. 

Getting excited about my next project, The Mint Julep!


Thanks for visiting!

~ Mini-Shack

Saturday, October 3, 2020

The Mint Julep by Walmer/Lilliput

After receiving this kit in the mail, I have thought about it pretty much every day, non-stop. I guess it's screaming for me to start this one next! I was exploring options to make it as beautiful as possible and came across a listing on eBay for a wing addition. The listing was from the same seller I bought the house from, who is also in the same Facebook group as me. I wasn't sure if it would fit my house so I started researching which model wing additions are compatible, and figured out there are 2 styles - a gable roof and a flat roof. I sent the seller a message on Facebook and she was kind enough to look though her inventory of kits. She was able to locate not one - but two - gable style wing additions. I would have preferred the flat roof addition, but there is probably a zero chance of finding two for sale. These houses are older and the companies are out of business. We made the arrangements and she shipped them right out to me. I am very excited to get started - but I need to quickly build a small house for a Christmas present for a relative. Which will probably be the Ashley or the Buttercup.

Here is a stock photo of the Mint Julep and the wing addition (can be left or right):


I'm not sure of the measurements yet, but I'm preparing for this to be a fairly large house. I really want to make it beautiful, with it's own base with landscaping. I'm going to need to take a trip to Lowes and get some plywood!

Progress picture to come.....I am currently waiting on a shipment in the mail of some corner trim that I desperately need to finish my Brimble's Mercantile. I ran out, and the roof shingles look horrible in the corners so I absolutely must cover those up. It'll enhance the overall look too, so it's a win-win. It is the only thing holding up my photo session. I don't dare post any pics with those ugly corners LOL. There will be a full post soon however on the Brimble's - aka "BB Sweets".


Thanks for visiting!

~ Mini-Shack