Friday, January 17, 2020

Now what?

Well...today I am officially the owner of a new-in-the box Brimble's Mercantile kit by Greenleaf. From the moment I thought about doing a bakery I wanted to do it in the Brimble's. It's been over a year, maybe two, since I started looking for one. I missed out on several on eBay, etc. so I kind of gave up looking. I started looking at other kits instead that were smaller, and I decided on the Greenleaf Buttercup. I picked one up for super cheap NIB...then I flip flopped to The Ashley by Dura Craft because I also found one cheap. So here I am with two cute little houses that are very similar, that will not end up as my bakery after all. I'm having thoughts of kit bashing the two together as one house. Or possibly building them both, and designing them similar to the Brimble's and making a coordinating bakery, tea shop and some other sort of shop. Currently I have five of my built houses on display in a row,  if I add these three I could end up with a village in 1:12 scale...oh my!

I'm thrilled to finally have a Brimble's, I don't have any photos yet but here's a lovey stock photo:


It's perfect for a bakery. It comes with some store fixtures such as built in shelves, signage and display cases. The upstairs will be the work and storage area and the downstairs will be the bakery. It's actually more than a bakery, there will be candy and ice cream too. The name of it is "BBs Sweet Shop". I am excited to get started! I will document this build along the way with photos, as I do with all my builds.

Here are some stock photos of The Buttercup (yellow house) and The Ashley (pink house):


They're both so cute, but as you can see they're very similar. I'm sure it will come to me, I'll know what to do with both of these houses when the time is right. It always seems to work that way :-)


Thanks for looking!


~ Mini-Shack

Wednesday, January 15, 2020

Ahoy! The Brookwood is ready for occupancy

After years of planning, and a few months of building, The Brookwood is finally done! I made a video with detailed shots of the interior and the exterior. I also did a separate video of the construction of the house, documented step by step. I found it helpful when I was building the ones I've done so far, so I wanted to share mine as well with the hopes it may help someone else.


Video of the Brookwood-Inside and Outside:


Video documenting the building of The Brookwood:


I kept the kit basic because frankly I was intimidated when I started building it. A few minor changes that I made include making the 2nd floor fireplace square instead of oval, leaving the staircase open as floating stairs to save space in the kitchen, and the obvious changes to the bar area railing. I modified the ladder to the attic simply by using the pop out's of the ladder in the wood sheet as steps for the ladder. They fit perfect of course! I did not use the brace that goes across the front of the house either. I tried, several times, with several modified versions of it, but it just didn't look right.

Maybe it's just me, but I feel a connection to each house. For this reason I like to keep original designs prevalent as a nod to whoever originally designed the kit. I used the kitchen set that came with the kit too, and honestly I had to because the space is challenging and it was a good size. I flipped it though from the way they show it on the box. Each kit I finish I save the wood sheets that all the parts have been popped out of, and the instructions, in the original box. When I was planning the balcony on this house I recalled the porch railing on my Greenleaf Arthur house. I used those pop outs (supposed to be discarded wood) as the decoration on the balcony. A nod to Greenleaf, it's a common pattern for many of their kits.

I also have special items in this house, as I do in every house. The attic is an art studio, and the artwork was painted by my adult son. He's a beach kid, always will be, this house is actually perfect for him! Most of the shells throughout the house were collected by me over the years in my hometown, which is on a beach. The chart maps on the walls are all of the Gulf of Mexico and Florida. One of the large maps on the wall features the Boca Grande (FL) Lighthouse and a large tarpon, our local catch and release sport fishing star.

Of course, there are also several elephants in the house, as usual!


I wouldn't mind building another one of these to be honest. Now that I know how it goes together, I have ideas of some kit bashing and I think I could do it. If anyone has any questions about the construction please feel free to ask!

I have several projects in the wings, ideas are flooding my head because three of the projects are all different directions: 1) a Bakery  2) a shabby chic 2 color only redo of the Alison Jr and  3) these two huge Harrison's!!! I also have the Dura Craft Pioneer log house sitting in the box ready to be built....and for some reason I bought a Dura Craft "Ashley" kit. It has a spiral staircase that I will probably use somewhere else, plus I love Dura Craft windows, they have such great silk screen designs. It was $20 sealed in the wrapper still, I mean come on!!!!! The staircase alone justifies it... HaHa. I still have the Greenleaf Buttercup kit too. One of these two houses will end up as a bakery, just not sure yet. I am still thinking about that Brimble's Mercantile I just can't get it out of my head, and there are 2 on eBay right now ughhhhhhh. Stay tuned, one way or another I'm doing a bakery.


Thank you for looking!

~ Mini-Shack


Wednesday, December 18, 2019

BB's Sweet Shop

Well I've done it again...I need to stay off internet resale sites...I couldn't pass up a deal for a Greenleaf Buttercup kit new in the box, which will eventually become "BB's SWEETS", my bakery and sweets shop.

I picked it up from a lady in my town and she also included a handy book called "Everything You Wanted To Know About Dollhouses But Didn't Know Who To Ask" written by Nancy Van Horn from the company Houseworks. Some of the information is basic, but there's a few good tips and tricks in there that I've found useful. Here's a photo of the cover of the book and the table of contents:


I'm excited about the Buttercup kit. For a while now I've been picturing a bakery in my head and scouting out different houses for the shop. I was really stuck on the Greenleaf Brimble's Mercantile, but I'm too thrifty to buy one new from Greenleaf. Plus, they only sell laser cut kits now and I want an original kit. They have come and gone on eBay, and I missed out on a few by hesitating. I decided to go smaller so I had narrowed it down to the Ashley by DuraCraft or maybe the Adams by Greenleaf. What I like the most about DuraCraft kits are the cool etched windows they always include. Plus the Ashley had a spiral staircase, which I was going to put in my Alison Jr. instead. But that's quite alright, I am very happy with my Buttercup purchase. I'd like to get it going right after the holidays..it's fresh on my mind but I do have several other projects sitting here staring at me, plus I need to finish off the interior of my Brookwood, which is what I am currently working on.

My plans for the bakery are fairly typical - shades of pink with decorative stripes and polka dots, with a lot of yummy treats in display cases. I'd like a few cafe tables or at least a counter bar as well. 

The kit came in a plain brown box (pictured in the photo of the book above) so I don't have a photo, but here is a stock photo of the Buttercup. Coincidentally it actually shows a sample of a shop:


Wish me luck on time and project management! HaHa.

Thanks for looking!

~ Mini Shack


Monday, December 9, 2019

A tale of two Harrison's

A few months ago my Mother called and asked if I was interested in an old wood dollhouse. Their neighbor's had passed away and their house sold and was getting torn down. Since the kids had already gone through it and removed all their parents belongings, my Mom and Dad walked over there to look around and they saw this dollhouse. She sent me photos from her phone and as it turns out it's a Greenleaf Harrison, about 80% built with the parts still laying on the inside. The best part is the windows are all there and still in great condition!


Greenleaf Harrison Dollhouse


You can sort of see in the photos that the rest of the chimney is there, staircases, remaining roof pieces and other parts.

Greenleaf Harrison Dollhouse

My parents live about 10 hours away from me, and if you know the Harrison, it's a huge house that does not fit in the backseat of my car or my trunk. So the next time I go up there I'll rent an SUV, or if someone else in the family goes they'll bring it back...one way or another I'll get the house down here so I can start finishing it.

In the meantime, I was browsing Facebook Marketplace and saw a DuraCraft Log Cabin "Pioneer" kit NIB for a good deal and pretty close to me. I went to go pick up the kit, and had a nice conversation with the owner, and mentioned that I had built several houses already. I left and about 5 mins later she text and said she had another dollhouse in the garage and would I be interested? I turned around and immediately went back. A few other ladies came out of the house and we went into the garage. There sat a beautiful, finished Greenleaf Harrison! They explained that their Mother built it and she passed away 7 years ago. They tried to fix it up, but didn't really know what to do - which also explains why the windows are gone, they tried to replace them. They offered the house to me for FREE on one condition - that I send them photos of the house once it's been rehabbed. She did a good job building it, and it has copper wire already run through it. She wasn't able to finish the inside, but it came with electrical supplies and quite a few lamps and a nice wood triple wide bookcase. Also inside was a miniature tudor house that she built. I later found out it is also from Greenleaf, and part of their set called "The Villages". I don't own any goodies for a 1:44th scale, but I'm going to finish off the mini tudor house too. I sure wish I could have met the lady, but I'll do my best to restore her house and all it's glory!


Here's the house when I brought it home (that's a Toyota 4 Runner it's sitting in, that's how big this house is!) Not shown in the photos is the rest of the roofing already shingled. It just needs to be re-attached. The balcony needs to be recreated, and of course - THE WINDOWS. That's the major stuff, the rest is minor.

Greenleaf Harrison Dollhouse

The inside is like a blank canvas....I can start from scratch. You can see the little mini tudor sitting inside it for scale.

Greenleaf Harrison Dollhouse

The mini-tudor house...it's so adorable! 1:44 scale

Mini Tudor House

Mini Tudor House

Mini Tudor House


The best part is I also have a new log house to build whenever I get around to it! It's going to be challenging for me, which is one of the reasons I wanted it. It's a little "outside the box" for me. It's not a plywood build, it's actual logs. I'm not quite sure how to decorate it either, but I think I'm going to go with white-washed wood logs and a cozy ski mountain house, with black-white-red checkered country fabrics. Here it is still in the box:

DuraCraft Pioneer Log House Dollhouse


So that's three more projects sitting and waiting for me! In addition to an Alison Jr. (Real Good Toys) make-over that I'm dying to get done, and three amazing room boxes that I picked up at a thrift shop for $10.

I also managed to pick up a Greenleaf Buttercup kit NIB for just $20 so I couldn't resist, I've had this bakery planned in my head for years so I can finally get that going too!!!

Oh yeah - it's also the holidays - lots going on!!!! 

Thanks for looking!

~ MiniShack

Meet the Brookwood Boat House

Update on The Brookwood by Greenleaf....after years of talking about it she's built and ready to decorate! What started as a beach house moved more towards a boat house, so I've started calling it my boathouse instead. She's even got a little boat called the SS Brookwood. These pics aren't the final resting place, they're staged for the photos. I'll be adding more little details as I go and will post the final pics once the interior and exterior are completely done.


Greenleaf Brookwood by MiniShack

Greenleaf Brookwood by MiniShack

A little bit of lighting for night fishing or star gazing. The lights are around the deck, the balcony, a tiny light in the mini lighthouse/birdhouse and spot lights on each side of the house in the trees.

Greenleaf Brookwood by MiniShack

Greenleaf Brookwood by MiniShack


First level:


Second level:


More night lighting photos:


I am hand-making a lot more in this house than I ever have before. I've been taking photos along the way to post tutorials, so those will be coming soon too. I'm still working on the inside of the house, it's coming along but I have so many ideas that I can't fit them all in one house!! I'll post updated photos soon. Thanks for looking!

~ MiniShack


Monday, October 8, 2018

The Arthur Dollhouse Video


I have been meaning to post this, I finally did the video of The Arthur! It's a fun little house that I enjoyed building and decorating. I learned a few things along the way, and ended up with extra furniture and accessories after I was finally done. I put some of my favorite stuff in this house, and I really enjoy looking at it and showing it off!

Please enjoy the video and feel free to ask any questions. Thank you for looking!


Monday, July 2, 2018

Ready for occupancy! Meet The Arthur...

This was fun, I enjoyed building this house. No hurry, I could work on it as little or as much as I had time for. I had a lot of ideas for kit bashing as I was building, and it's not out of the question that I buy and build another one, the way I really want it.

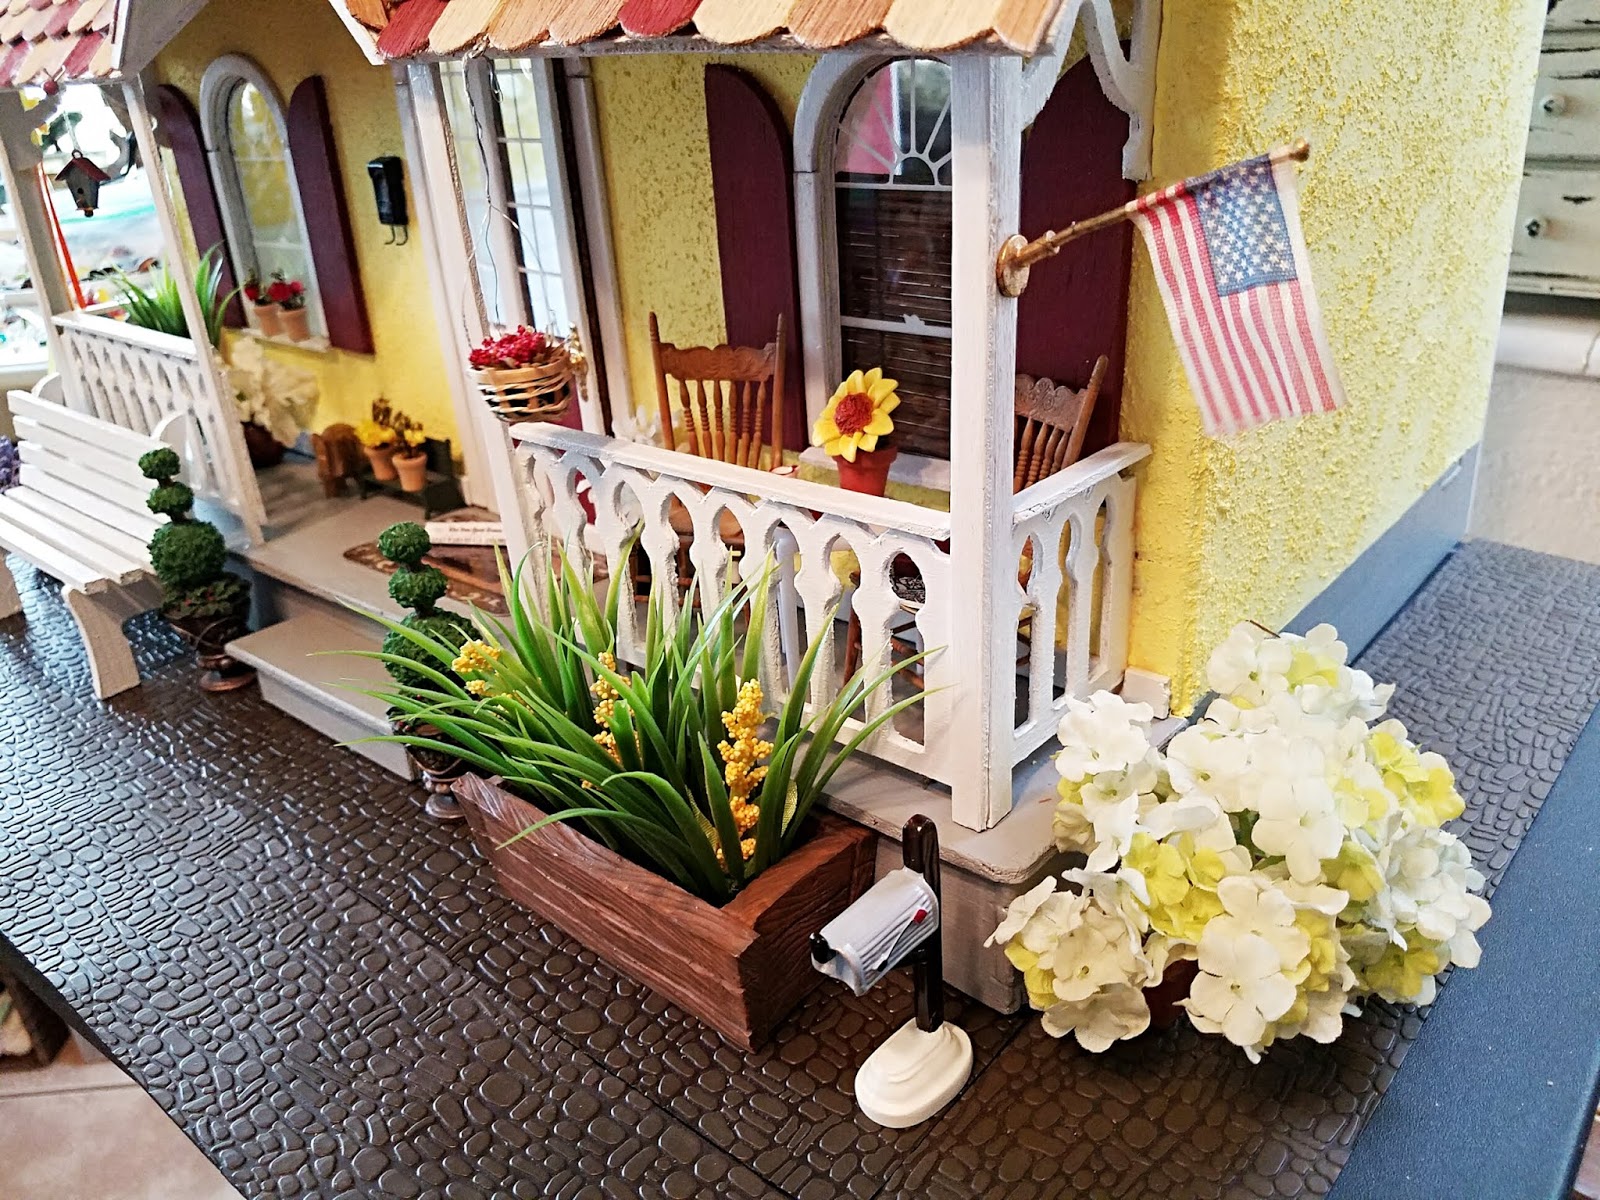
For now though, here are finished pics of my current Arthur:


The Arthur
The Arthur by Greenleaf


The Arthur - Back
Inside The Arthur


The Arthur

The Arthur
The Arthur

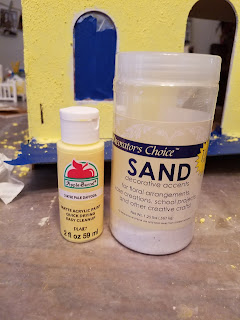
The exterior is stucco - simply made with a mixture of paint and sand. Very simple and easy to apply. Hard on the brushes, and kinda makes a splatter mess, but I love the results.
The Arthur
The Arthur - Stucco Exterior

The Arthur
The Arthur - Stucco Exterior
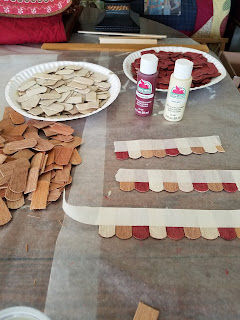
The roof shingles took forever, because I chose to paint half of them 2 different colors and then apply them individually (still in strips on masking tape). It was a labor of love, and I'm happy with the way it turned out overall.
The Arthur
The Arthur - Shingles for the Roof
I like to add a touch of personalization to my projects. I had this little decoration in one of my boxes, thought it would look good in this spot. I made the flower boxes for the three upper windows with balsa wood, glue and paint.

The Arthur

Detailing the front and porch was fun, but I didn't want to go overboard because the back (front) will be facing a mirror.

The Arthur

Notice the statue next to the potted plants by the welcome mat, hard to tell but it's an elephant. ALL of my houses have elephants in them :-)

The Arthur


I found this wind sock on eBay, it was in an estate lot and I bought the whole lot just to get this one item. I love it on this house, it's perfect!

The Arthur

This little birdhouse is also one of my favorite eBay finds. It's metal and hand painted.


I'm actually almost done decorating and furnishing the interior, but here are some pics of the empty version: 


I made a ceiling fan for the living room, it's not shown in this photo but it will be in the finished photos. The mini blinds are made from 1 rattan placemat I bought at Dollar Tree. I cut it to measure then used paint stain ...the living room window and also the bathroom window, which I painted white.

The Arthur
The Arthur - Living Room

The kitchen floor looks like white tile, I made it with Paperclay. I flattened it with a rolling pin, scored it with a straight edge, then painted it white. Added a few layers of Modge Podge to shine it up and seal it. The walls are clapboard siding painted white, and the wallpaper is actually scrapbook paper. The light is a giant bead glued to the ceiling.


The Arthur
The Arthur - Kitchen

I have a whole Rubbermaid tub full of sample wallpaper books I got from a paint store that went out of business. It really came in handy when decorating this bathroom! 

The Arthur
The Arthur - Bathroom

I made the ceiling fan for the bedroom with popsicle sticks and jewelry beads. It was so easy!! The chandelier above the staircase is just a couple fancy beads hung onto a paperclip. The white carpet is from a pack of colored felt pages I bought at Dollar Tree. The curtains are part of a yellow pack of swatches I bought at WalMart for $1. I used the rest of the fabric swatches to make the bedding and pillows. The walls are covered in scrapbook paper and white/grey/yellow paint.


The Arthur
The Arthur - Bedroom

The Arthur kit doesn't come with a railing for the staircase landing in the bedroom, so I picked up a bare kit on eBay and added wooden beads to the posters and painted them grey for some extra decoration.

The Arthur
The Arthur - Bedroom


I didn't do any outside landscaping because I wasn't sure exactly how and where I was going to place this for display. I found the perfect sized TV tray, and a super large mirror I'll hang up behind it so it can be seen from both sides. 

My next project, The Brookwood, also by Greenleaf, is already underway. It's beach themed, so I've been making and buying all sorts of cool little items. As with any dollhouse, the imagination is limitless!

As soon as The Arthur is complete I'll post the interior pictures, and make the video. I have a YouTube page that my projects are on. 

Thanks for looking!!